Creating book covers for your novel
Create Space is a great program for making paperbacks, but first you need to design your covers.
Here are the simple steps.
- Download a Cover Template from Create Space to suit your book
- Using photo editing software, create images for your front cover, spine and back cover. Use the sizing from the Cover Template to get exact sizing for these images
- Use something like Adobe to open your template, then add the images you have made in the correct places.
- Flatten the layers and save the new cover file.
Here are these steps again, but with a little more information on what to do at each step.
Download a Cover Template from Create Space to suit your book
Here is the link where you can enter the specs
for your book and download a template for setting up your book cover.
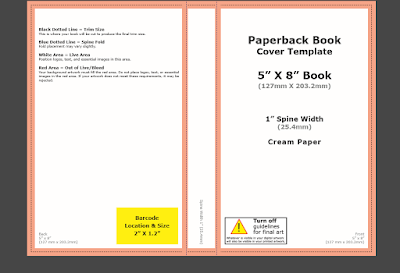
This is a sample of what it could look like.
If you use the template, you will
have correct dimensions and layout as well as bleed and trim size for the page
count you choose.
- On the web page you need to enter the interior type, most novels are just printed in black and white and this is the cheapest option.
- Then enter your trim size. This is the size of the book. The most common trim sizes for standard trade fiction and nonfiction books include: 5" x 8", 5.5" x 8.5", and 6" x 9".
- Then enter the number of pages in your book. Use your editing file for this page count as it needs to include pages before and after the body of the text which will not be included in your “page numbering”. Have a look at the bottom of your Word or editing screen and see how many actual pages you have.
- Then decide if you want your book on cream or white paper. Personally, I think cream looks more professional and traditional, however white is also a nice crisp look. This will change the template size so you need to make a choice at this point.
Placing your artwork on the Cover Template
- You need to keep your text and images minimum of .125” inside the trim lines to make sure nothing is cut off in the printing process.
- The title on your book must be precisely the same as when you begin your setup process with Create Space.
- When you are adding images, they must be flattened to one layer and they need to have a minimum resolution of 300 dpi.
- For the spine of your book, make sure you leave at least 0.0625" on either side of the fold lines for your cover. Try not to have hard lines or block edges on the fold line. Better to blend the front and back covers and spine as one colour to avoid a weird change of colour or a line that does not line up exactly with the fold in the spine.
- For books with 130 pages or less, Create Space recommends a blank spine. Blank spines are required for books with less than 101 pages.
- At the bottom of your book's back cover in the right hand corner, Create Space will add your ISBN barcode in a 2" by 1.2" white box. The sizing templates show exact barcode placement, so don’t place any images or text in this area or it will be covered with a barcode, or at least don’t put anything important there.
Here are the instructions from Create Space on
Preparing for Printing
- The printable area of your document must be
the right size, including bleed.
- Make sure the printable area is centred within
your document.
- Make sure all live elements are inside the
safe zone.
- Export
your file as a print-ready PDF. Be sure fonts are
embedded.
- The maximum accepted file size for your book
cover is 40 MB.
- Download the CreateSpace Submission Specification in
one document.
Using photo editing software, create images for your front cover, spine and back cover. Use the sizing from the Cover Template to get exact sizing for these images.
You need to create a PDF file for your covers that fits the Create Space guidelines.
Here's how...
Initially, you need to create a front cover image, a back cover image and a spine image, which can be placed together to form your book cover. Once you have these files prepared, you can use the Create Space Cover Templates to build your PDF cover.
There are plenty of free photo editing software packages available on-line where you can add your background photo/image and add text and effects before saving.
Front Cover:
- Make sure you have suitable photo editing software
- Choose or buy your images for your front cover
- Create a file in your photo editing software, upload your photo and size to your book cover size
- Add text for book title, author's name, etc
- Add any effects to make it look cool
- Save
 Back Cover:
You might like to use a plain colour for the back that blends into your spine and front cover.
Make sure your dimensions are exactly that of your front cover and fit your Cover Template correctly.
Add your blurb on the back of the book, or author bio, or photo, or all three.
Remember, don't put anything important where the barcode will go, this is shown on your Cover Template.
Spine:
Simple enough. Make it blend nicely into front and back covers
Add your title and author. If you are adding these sideways, the top of the words face right as shown.
Use something like Adobe Acrobat to open your template, then add the images you have made in the correct places.
Below, where the images are pasted onto the Cover Template, you will notice the spine does not exactly line up with the markers in the pink section and tiny gaps have not been left between back, spine and front, so this one needs a little more work.
Finally don't forget to flatten the layers and save the new cover file.
Get Dan O'Sullivan's Trilogy on Amazon
Book 1 - The Fallen
Book 2 - The Guardians
Book 3 - Child of a Guardian and of the Free


Comments
Post a Comment